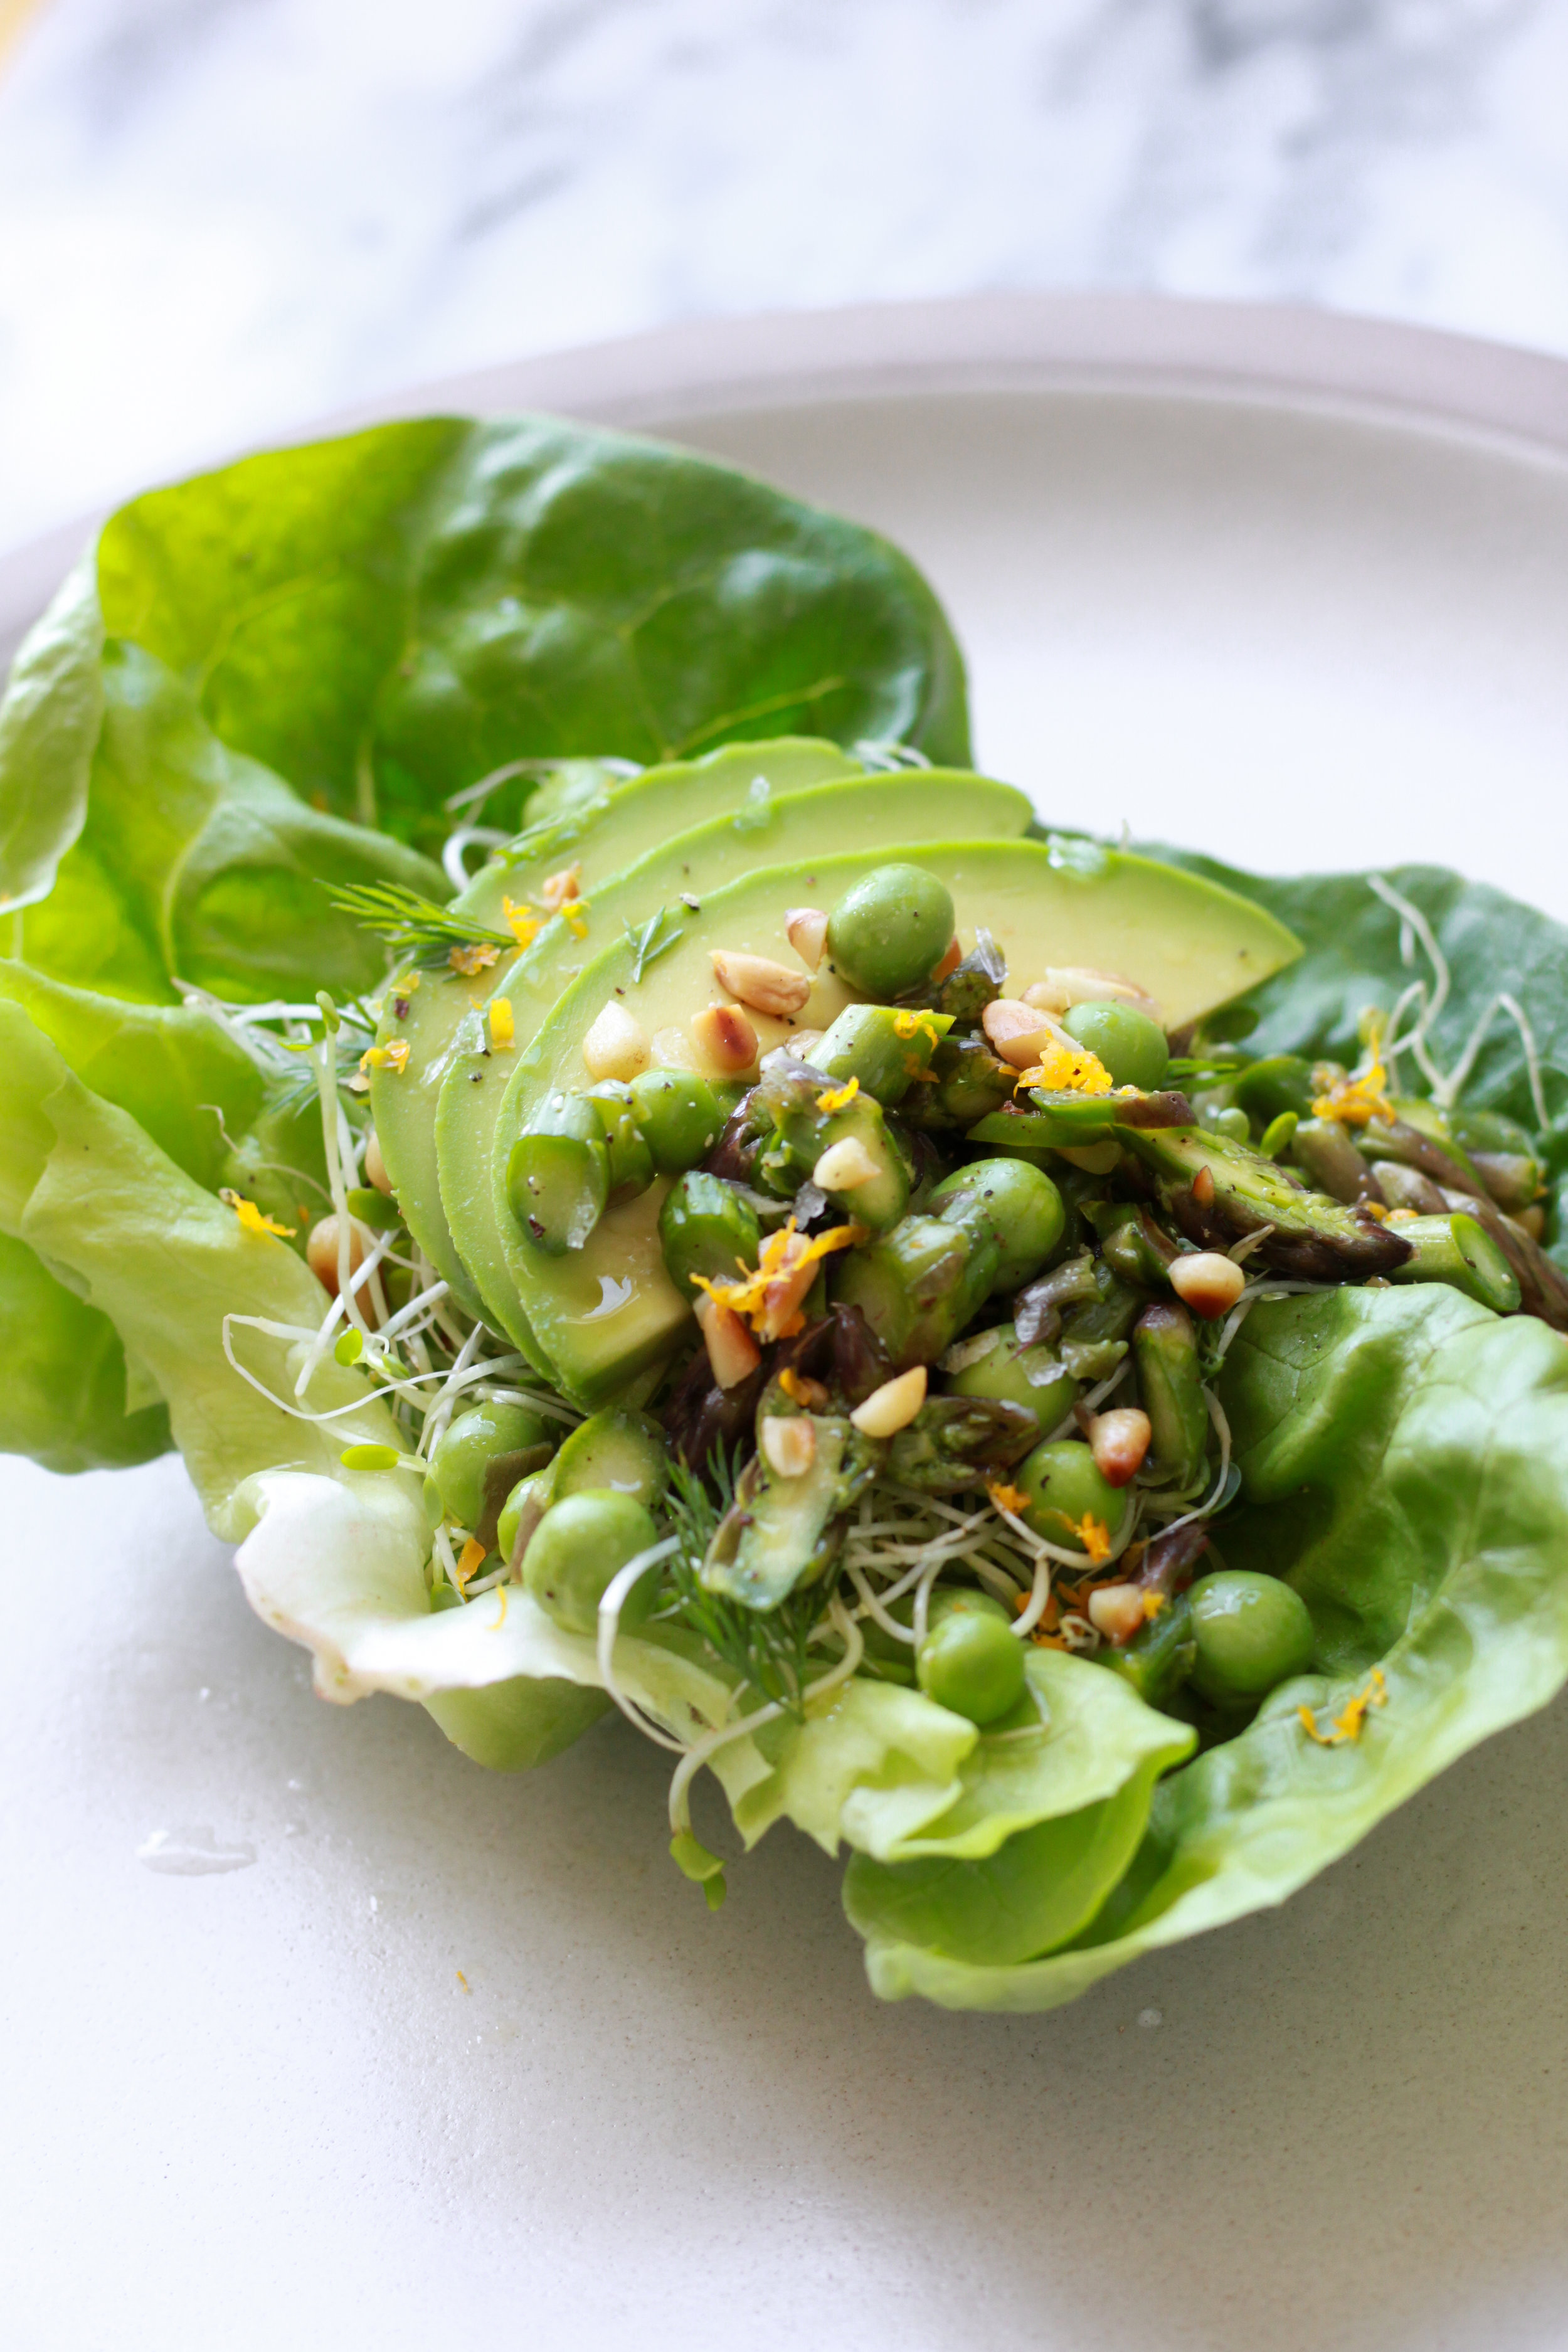
Spring Green Veggie & Herb Lettuce Cups

lettucecups1.jpg
asparagus1.jpg
englishpea.jpg

Super simple and fresh, this is essentially a handheld salad that celebrates the early bounties of spring.

I opted to stick with lemon and olive oil for the dressing to let the brightness of the vegetables shine through; if you’re keen to douse the lettuce cups in tahini or have a green goddess or other dressing that you like, definitely do!

Great as a side dish, these lettuce cups can easily become a full meal by mixing in some flaked salmon, chickpeas or other protein of choice. Happy spring!

untitled (6 of 11).jpg
asparagus2.jpg
lettucecup2.jpg
lettucecup3.jpg
lettucecups_duo.jpg

Spring Green Veggie & Herb Lettuce Cups
Makes 4 lettuce cups

Ingredients
1/2 bunch asparagus
1/2 lb English peas (in their pod)
1 Meyer lemon
2 Tbsp. pine nuts
2 Tbsp. olive oil
1/4 cup mixed herbs (mint, dill, chives, parsley, chervil are some nice options), roughly chopped
1 avocado, sliced
a few handfuls alfalfa sprouts
4 large butter lettuce leaves
salt & pepper

Directions
1. Cut off the bottom woody ends off the asparagus (1”-2” up from the bottom) and discard. Cut each asparagus stalk into 1/4” slivers at an angle and put into a medium sized bowl.
2. Zest the lemon and set zest aside. Squeeze the juice from the entire lemon over the asparagus. Add a couple pinches of salt, toss and set aside.
3. De-pod the English peas, adding the peas to the bowl with the asparagus as you go. Mix the two together.
4. In a small pan, toast the pine nuts over medium-low heat until golden brown, 5-7 minutes, stirring or tossing frequently. Once they’re golden, transfer immediately to a cutting board so they don’t burn. Roughly chop.
5. Add the olive oil, lemon zest, 3 Tbsp. of the chopped herbs and a few grinds of black pepper to the asparagus and peas. Stir to combine. Taste and adjust salt and pepper as needed.
6. Assemble the lettuce cups: In each butter lettuce leaf, place a layer of alfalfa sprouts, slices from 1/4 the avocado, and a couple spoonfuls of the asparagus and pea mixture (and its lemon-oil-herb dressing). Finish off with a few pinches of chopped pine nuts and the remaining fresh herbs.

Pickled Peach, Burrata & Pea Shoot Salad with Creamy Basil Hemp Dressing

IMG_6347-1.jpg
IMG_6237-3.jpg
IMG_6303-5.jpg
IMG_6293-4.jpg

Yikes, September! I'm squeezing in this summery salad as the darkness is setting upon our days a little earlier and the evenings are marked with the beginnings of chill. Hopefully you still have peaches at your farmers market or local grocer! (In California, we're spoiled.)

This is a truly simple salad that presents itself as fancy AF. The sweet-tang of the pickled peaches plays well off the creaminess of the burrata, crunch of the pepitas and brightness of the sprouts and herb-y dressing.

The dressing, made creamy thanks to the small yet mighty hemp seeds, is packed with essential omega-3 and omega-6 fatty acids AND contributes complete protein to the dish! Hemp seeds are actually a nutritionally amazing food, y'all. Peaches can be pickled a couple days in advance. Enjoy!

IMG_6185-6.jpg
IMG_6202-7.jpg
IMG_6312-8.jpg
close1 (1 of 1).jpg
areal1 (1 of 1).jpg

Pickled Peach, Burrata & Pea Shoot Salad with Creamy Basil Hemp Dressing
Serves four

Ingredients
Pickled Peaches
1 large yellow peach, slightly firm, sliced into 12 wedges
1 cup apple cider vinegar
1/3 cup raw honey
1/2 Tbsp. Kosher salt
1 bay leaf
1 cinnamon stick
5 whole cloves
16oz Mason jar and lid, preferably with a wide mouth

Creamy Basil Hemp Dressing
1/2 cup hemp seeds
6 large basil leaves
2 Tbsp. lemon juice
1/2 Tbsp. cold-pressed olive oil
1/2 Tbsp. apple cider vinegar
1 giant pinch salt

Toasted Pepitas (Pumpkin Seeds)
1/4 cup raw pepitas

Salad
1 container pea shoots
2 burrata balls
12 slices pickled peaches (recipe above)
Creamy Basil Hemp Dressing (recipe above)
Salt & pepper, to serve

Directions
1. Make the pickled peaches: In a small pot, combine all the pickled peach ingredients except the peaches. Bring to a boil, reduce to a simmer and stir occasionally until the honey and salt are fully dissolved. Let cool 10 minutes. While the brine is cooling, squeeze the peach wedges in the Mason jar. Pour the brine over the peaches, cover, and let stand at least 20 minutes.*
2. Make the dressing: In a high speed blender, pour 1/2 cup of filtered water and add all the dressing ingredients. Start blending on low, increase to high and blend until all the ingredients have become emulsified and smooth. Taste; add salt if necessary.
3. Toast the pepitas: In a dry frying pan (i.e., without oil), toast the pepitas over medium heat for about 5 minutes, flipping occasionally via shaking the pan. Pull from the heat as soon as they become aromatic and start to make intermittent popping sounds. Transfer to a plate to cool.
3. Assemble the salad: Layer handfuls of pea shoots, torn bits of burrata and a few pickled peaches on each plate. Pour dressing over the salad. Top with toasted pepitas, a pinch of salt and freshly ground pepper.

*Store pickled peaches in refrigerator if you make them in advance or have leftovers.

Blistered Snap Peas with Miso Butter

IMG_5482.jpg
IMG_5444.jpg
IMG_5535.jpg

In all honesty, this is kind of a non-recipe—which is often what summer calls for, when produce is bountiful and flavorful even with little to no preparation. It’s a recipe for those times when you’d rather be outside than in your kitchen, or taking your kitchen outside (to the grill).

This recipe is simply charred snap peas slathered in miso butter—which is miso paste mixed with butter. Simple, simple, simple but whooooa is it delicious. I made it in a cast iron pan because I don’t have a grill, but if you do have a grill, go ahead and throw the snap peas in a grill basket and go to town. It’s the perfect appetizer for a low key evening of entertaining or side dish to a weekday meal.

IMG_5563.jpg
IMG_5587.jpg

Blistered Snap Peas with Miso Butter
Serves 4 as a starter or 2-3 as a side

Ingredients
1 lb. snap peas, woody ends cut off
3 Tbsp. room temp butter, organic and pastured if possible
1 Tbsp. sweet white or mellow yellow miso paste
flaky salt and freshly ground pepper

Directions
1. If you have a grill, place the snap peas in a grill basket and grill until blistered. If not, heat a cast iron skillet on medium high. Place a third of the snap peas into the skillet and, using tongs, spread them out so that each snap pea is touching the surface of the pan. Cook until blistered, about 2 minutes, then flip and cook the other side for 1 minute. Repeat with remaining snap peas.
2. In a small container, cream the miso together with the room temperature butter. You will have leftovers (you're welcome).
3. Take a generous spoonful of the miso butter and slather over the warm snap peas. Finish off with a generous pinch of flaky salt and freshly ground black pepper.

Lemony Fava Bean Tartine

IMG_4108.jpg

This is a super simple celebration of spring. As the bounties of the season begin to pour in, we are blessed with vibrant and delicious produce that often requires little to no cooking. I also love the revelations that come with tasting fresh foods straight from the pod or the cob that you might eat from frozen at other times during the year; there is no comparison! Fava beans are less common in the standard American diet than, say, peas, which is a shame because they are suuuuper delicious. They also happen to be crazy nutrient dense, containing an array of vitamins (folate, thiamine, vitamin K, vitamin B6) and minerals (iron, manganese, potassium, copper, zinc, magnesium) in addition to fiber and protein! 

I used dill and tarragon in this recipe because I seem to perpetually have leftovers of those herbs in my fridge as of late. This would also be delicious with mint, basil, chives, chervil, parsley, or some combination thereof. You can have it on toast or off; with an egg or without. The basic equation here is fava beans + herbs + lemon = yum. It's pretty much that simple.

Lemony Fava Bean Tartine
Makes two toasts

Ingredients
1 1/2 cup fava beans (from about 1 lb. favas-in-the-pod)
1 unwaxed, organic lemon, zested
1 1/2 Tbsp. fresh squeezed lemon juice
3 Tbsp. cold-pressed, good quality olive oil
1/8 tsp. pink or sea salt
2 handfuls pea shoots
1 Tbsp. dill fronds, fresh
1 Tbsp. tarragon leaves, fresh
Two slices whole grain or country sourdough
Soft boiled egg (or cooked to preference)
Fresh ground pepper, to finish

Directions
1. Bring a medium pot of water to a boil. Fill a medium bowl with ice water and set aside. Cook fava beans in the boiling water for 1 minute, then strain and transfer to the ice water. Peel the waxy outer coating from the fava beans.
2. In a medium sized jar with a lid, shake together the lemon zest, lemon juice, olive oil and salt. Add the fava beans to the jar and gently shake to coat.
3. Toast your bread — a toaster is great but a grill pan with some olive oil would be extra delicious.
4. Place one big handful of pea shoots on each toast slice. Pour the favas and their oil on top of the greens (you may have a bit of oil leftover; it makes great salad dressing!). Sprinkle 1/2 Tbsp. of each herb onto each slice. Top with an egg if desired and a few twists of freshly cracked black pepper. Enjoy!

Springtime Greens, Herbs & Citrus Salad with Warm Pistachio Vinaigrette

pea1.jpg

I recently made a new friend, Alanna, who happens to be an immensely talented blogger/photographer/food maker extraordinaire (don't take my word for it; go see for yourself). She also happens to be a super generous human being who spent an afternoon with me a couple weeks ago styling food and sharing her props and teaching me how to change the aperture on the manual setting of my not-always-the-most-intuitive camera. If you're thinking these photos look wayyyy fancier than my normal ones do, it's because they are. Thanks, Alanna!! You're the best.

This salad quite possibly epitomizes the transition from winter to spring, pulling together late season citrus and a whole mess of fresh, sweet and peppery spring greens (including pea tendrils!!! If you haven't had those before, you're in for a treat. They're seriously amazing). Essentially, this means that this is a salad for RIGHT NOW, while farmers and locally-inclined markets still have unusual seasonal citrus like Cara Cara oranges overlapping with get-em-while-you-can spring greens. It's vibrant and fresh, great for supporting your body in its transition towards lighter, warmer weather foods, while still being quite satiating thanks to the healthy fats from the avocado and pistachio vinaigrette. 

//

Springtime Greens, Herbs & Citrus Salad with Warm Pistachio Vinaigrette
Serves 4

Ingredients
Salad
1 bunch watercress
1 head frisée, roughly chopped
1 bunch pea tendrils (or sub other fresh, leafy spring green if you can't find them)
1 fennel bulb, thinly sliced
1 avocado, diced
2 Cara Cara oranges, sliced into 1/4" rounds
3 Tbsp. dill fronds (fresh)
3 Tbsp. tarragon leaves (fresh)

Dressing
1/4 cup cold-pressed extra-virgin olive oil
1 small shallot, minced
2 Tbsp. champagne vinegar (or sub white wine vinegar)
1/3 cup raw pistachios, roughly chopped
1/4 tsp. sea salt
black pepper

Directions
1. Toss together all the greens, fennel, avocado, orange slices and herbs and place in a large serving bowl or on a platter.
2. In a small frying pan, warm the olive oil over low heat for two minutes. Add the minced shallot and cook for a few minutes, until translucent.
3. Add the vinegar, salt and a few grinds of black pepper to the saucepan and stir to combine. Add the pistachios and toss to coat.
4. Spoon the pistachio vinaigrette over the salad. Finish off with a couple more grinds of black pepper and finishing salt (if you have it) to taste.

Marinated Asparagus, Red Onion & Goat Cheese Salad

If you read my first-of-the-season asparagus recipe post, you'll already know that this oft-coveted springtime vegetable was a reeeeeally hard sell for me. Like, 27 years of life hard sell. But eventually, as my taste buds and my psychological aversion to vegetables both evolved, I began to willingly eat these green stalks of goodness. The recipe that was the asparagus turning point for me is actually the one I'm sharing with you here. It was created by one of the chefs at my former place of employment (hey, Mike!), who made this for staff lunch one day. It blew me away, not only because it was delicious, but because it was RAW. Raw asparagus?! Who would ever think to eat such a thing?! As it turned out, I actually like the taste of raw asparagus better than cooked because I find its flavor to be more mild. It also retains more of its vitamins and minerals when consumed raw. Letting it marinate in some acid, like we do here, also helps break down its starches which makes it softer and easier to digest. Win-win!

Asparagus: All the Best Anti-'s

I'm sure it comes as no surprise that asparagus is crazy good for you. While it is not in the cruciferous vegetable family (think cauliflower and cabbage), it contains comparable levels of anti-oxidants and anti-inflammatory phytonutrients as these powerhouse vegetables. Its antioxidant profile includes beta-carotene, vitamin C, vitamin E, zinc, manganese and selenium. Eating a diet rich with anti-inflammatory and anti-oxidant foods is essential to ward off some of today's most prominent diseases—type 2 diabetes and heart disease—which develop out of chronic inflammation and oxidative stress in our bodies. Vegetables like asparagus help keep our bodies in balance and these diseases at bay. Food is medicine, y'all! 

Another health-supportive property of asparagus is its incredible B-vitamin content. One of the main responsibilities of B-vitamins is to convert the food we eat (carbohydrates, fats and proteins) into into fuel (glucose), which then gives us energy. Because they play a key role in this metabolization process, they are essential in maintaining healthy levels of blood sugar. Asparagus contains high levels of vitamins B1 B2 and B6, folic acid (B9), niacin (B3), choline and pantothenic acid.*

*Nutritional information from WHFoods and University of Maryland Medical Center.

Marinated Asparagus, Red Onion & Goat Cheese Salad
Serves two
Recipe adapted from Mike de la Torre

Ingredients
1 bunch asparagus
1/2 medium red onion
1 large Meyer lemon (regular is okay too if you can't find a Meyer), zest and juice
3 Tbsp. good quality cold-pressed olive oil
generous pinch of salt
1/4 cup raw almonds
goat cheese, to finish
soft boiled egg (optional)

Directions
1. Slice the onion into very thin half-moons. 
2. In a medium bowl, zest the lemon and then squeeze 1/4 cup's worth of juice into the bowl.
3. Add the onion slices, toss with the lemon juice, add a generous pinch of salt and set aside.
4. Cut off the woody bottom third of the asparagus stalks. Slice the remaining tender part of the stalks on a diagonal into 1/4" thick coins.
5. Add the asparagus to onions and toss to coat.
6. Heat toaster oven to 325°F. Toast the almonds until fragrant, about 10-12 minutes, tossing halfway through. Roughly chop.
7. Add the olive oil to the marinated asparagus and onions, gently mix, and transfer to your serving bowl. Add chopped almonds and your desired amount of goat cheese. Season with salt and pepper to taste. Finish with a soft boiled egg, if desired.

Tahini Honey (Halva) Macaroons

It's a little crazy, how many years I had been eating hummus before I knew what tahini was. It was never a part of my childhood pantry and, as I only ever encountered it blended into a delectably creamy mess of chickpeas, lemon and garlic, I suppose it makes sense that I hadn't heard of it until I started getting into food in my mid-20's. 

I remember discussing tahini with a friendly employee at my local independent market when I was living in London and how enthusiastically this young, bearded, flannel-wearing Canadian man extolled its virtues. My brain struggled to wrap itself around the fact that A) there was an equivalent of peanut butter made out of sesame seeds and, B) that it was the second main ingredient in a culturally relevant dip that I had been enjoying my entire life. I hastily bought a jar, trotted home, opened it, dunked in a spoon, put the creamy paste to my mouth and—BLEH!!—almost spit it out. It was SO BITTER! I could not comprehend who would voluntarily eat this stuff, let alone recommend it to other people.

Needless to say, I eventually wholeheartedly boarded the tahini train. The turning point came almost a year later when a new friend (incidentally, also Canadian) asked me if I wanted some halva—a Middle Eastern treat which I had also never heard of. Shaped into a bar with the consistency of snappy nougat, this mysterious dessert is traditionally made with two ingredients: tahini and honey. Little did I know it, but this was a watershed moment. Halva changed my life.

Let's just take a moment to appreciate the divine relationship of these two ingredients. Have YOU ever mixed tahini with honey (and a pinch of salt) and spread it on toast…or eaten it with a spoon? Game changer. For real. (On a side note, don't ever buy the commercially packaged halva you typically see in grocery stores or Middle Eastern markets, as it's loaded with corn syrup and other junk. If you're curious to try it—which you totally should—make sure the only ingredients on the package are sesame and honey. Or get it from an outdoor market in Israel, where it is a whooooole other level of cloud-like, melt in your mouth deliciousness.)

A Tale of Two Tahinis

As I began to fully integrate tahini into my life, I quickly learned that there are two different types of tahini: hulled and unhulled. But what does this even mean? What is the difference in flavor, consistency and nutritional value?

The easiest way to understand it is to liken the sesame seed to a grain of wheat, as they both have an outer shell that contains a hefty portion of their nutrients. When this outer bran is removed from a grain of wheat, we get white (or "all purpose") flour; when the outer shell of the sesame seed (called the "hull") is removed (as shown in the middle sesame seed photo above), we get a lighter, more refined version of tahini. This is hulled tahini. Unhulled tahini is like whole wheat bread: thicker, darker, maybe not as sweet and tasty, but packed with way more nutrients.

For such a tiny thing, sesame seeds are actually an incredible source of copper, calcium, magnesium and iron. While the hulled seed still contains some of this nutritional value, it is no longer a whole food and much of it is lost. Take the calcium, for example. According to WHFoods, one tablespoon of unhulled sesame seeds contains about 88 milligrams of calcium (for perspective, one tablespoon of whole milk only contains 17 mg of calcium; maybe we should start feeding our youths sesame milk instead?). Once the hull of the sesame seed has been removed, the calcium content plummets to about 37 milligrams, which is 60% less! 

Unfortunately for us, most commercial brands of tahini are made out of hulled sesame seeds because they blend more smoothly and are less bitter in taste. Unless your jar of tahini says "unhulled" or "whole" in front of the word "sesame" on the front or in the ingredients list, it's safe to assume that you've got the refined version. I picked up a jar of Al-Arz Whole Sesame Tahini in Israel which was the sweetest tahini I've ever tasted. When I returned home, I was able to track it down at a Jewish market in LA (yes, okay, I emailed the manufacturer to find out if they had US distribution, shhhh). Sadly, I haven't found a single brand of unhulled tahini in the Bay. But the good news is that if you can't find it in your area and don't want to buy it online, you can always make your own. Just make sure you buy raw, unhulled (brown) sesame seeds when you do!

Halva is the New Healthy [Macaroon]

I knew I wanted to create something to share with you all in time for Passover (in case that's your jam) that would also be non-denominationally delicious. Running through the list of traditional dishes in my head, it wasn't too long before lightning struck: halva macaroons! Most of the macaroon recipes I've seen and tested use condensed milk as the primary sweetener and binder, which yes, is delicious, and is also pretty terrible for you. Halva spread (tahini + raw honey, not turned into candy-nougat-treat) is delicious, super nutritious, AND basically the consistency of condensed milk! I felt like I was onto something big, and guess what? It totally worked! 

I made these macaroons on the larger side because I was feeling excited about them and was feeding them to grown adults, not small children (mostly; hi Sadie and Theo!). I invite you to make them whatever size feels right for your crowd, just be mindful to adjust the baking time accordingly. I also drizzled the chocolate because I thought it would look pretty, but I encourage you to dip the tops of the macaroons in it if you want a richer party in your mouth. 

Tahini Honey (Halva) Macaroons
Adapted from Danny Cohen's 'Danny Macaroons' recipe
makes 26 1" cookies

Ingredients
2/3 cup tahini (preferably unhulled) 
1/3 cup raw honey
1 tsp. vanilla extract
14 oz. (4 1/4 cups) unsweetened, shredded coconut
2 large eggs, whites only
1/4 tsp. sea salt
1/4 cup dark chocolate chips
1 tsp. coconut oil
Flaky sea salt (like Maldon), to finish

Method
1. Preheat oven to 350°F. Line a baking sheet with parchment and set aside.
2. In a small saucepan, melt honey over low heat until entirely liqueified.
3. Add tahini and whisk together until the mixture becomes like the consistency of condensed milk, thick but still runny.
4. Whisk in vanilla.
5. In a large bowl, mix together the shredded coconut and salt.
6. Pour the tahini honey mix into the coconut and, using your hands, blend together until the coconut is entirely covered. The consistency will be sticky and crumbly, almost like a crumb cake topping.
6. In a stand mixer with a whisk attachment or with an electric beater/whisk, beat the egg whites until stiff peaks form.
7. Gently fold egg whites into the coconut mixture.
8. Using your hands, form 1"-2" balls with flat bottoms out of the coconut mixture and set on parchment. They can be set close together, as they will not expand when baked.
9. Bake macaroons for 13-18 minutes, depending on size, until the tops and bottoms are golden.
10. Once the macaroons are done baking, remove from oven and set aside. Cool completely on tray.
11. Melt chocolate chips and coconut oil in a double boiler. Drizzle chocolate over macaroons with a fork or, once the macaroons have cooled, dip the tops or bottoms of them into the chocolate. Finish with a pinch of flaky sea salt.
12. Refrigerate for 10 minutes to allow the chocolate to set. 

Macaroons will keep refrigerated for up to a week.

Asparagus, Caper & Toasted Almond Tartine

Living in California, the seasonal transitions are almost marked more by the rotations of produce that adorn farmers' market stalls than by drastic shifts in weather. Each season has its show stoppers, the fruits or vegetables that define a particular time of year. For springtime, it's asparagus. (Okay, and green garlic and probably a few other things, but asparagus is definitely high up on that list.) Some people probably wait all winter long to see those lean, green stalks appear at the market. No offense, but these people seem absolutely nuts to me.

Let's be real: asparagus is a challenging vegetable. It is potent (some may argue pungent) in flavor and scent. I hated it until, um, last year. I still don't love it. But! I have been introduced to methods of preparing asparagus that compliment or mellow its taste in ways that make it palatable if not even, dare I say it, delicious. The most recent method—which was so good that it is now the subject of this post—came by way of my boyfriend, who (conveniently for me) is a pretty spectacular cook. I was decidedly disinterested the evening he excitedly proclaimed he had bought a bunch of asparagus and I remained so when he later departed to the kitchen to turn it into a "snack". Twenty minutes later, drawn to the kitchen by the sweet smell of toasty almonds and browning butter, I found my anti-asparagus resolve melting away. I leaned towards his plate to examine its contents, was offered a bite, and succumbed. I was immediately dumbfounded. Staring at T in disbelief, I demanded to know what he put in that thing to make the asparagus taste so delicious. And then I ate half the food on his plate.

I knew immediately that I needed to share his divine and startlingly simple concoction with you. At the start of spring, so you can make it for yourself and then for your friends and then for your family and then for yourself again, all before the season ends. So, what are we waiting for?

Springtime Asparagus Tartine
Makes four generous tartines

Ingredients
1 bunch asparagus (preferably skinny stalks)
1 Tbsp. ghee or butter (sub cold-pressed olive oil if you're vegan)
1/2 Tbsp. dry white wine (or juice from half a lemon)
1/4 cup raw almonds
2 Tbsp. capers (preferably salt preserved), rinsed
1/4 cup flat-leaf parsley, minced
2 large slices of fresh, crusty Boule (whole grain blend & sourdough are great), cut in half
salt & pepper, to taste

Method
1. Heat oven or toaster oven to 325°F. Spread almonds on a baking sheet and toast until fragrant, 10-12 minutes, tossing halfway through.
2. While the almonds are roasting, prep asparagus. Cut the woody bottom third off all the stalks and discard. Cut the remaining stalks into 1 1/2" segments.
3. When the almonds are toasted, remove from the oven and roughly chop. Set aside.
4. Heat the butter or ghee in a large, heavy skillet over medium heat. When hot, toss in asparagus, reduce heat to medium low, and sauté, gently stirring, until the spears start to become tender and acquire a bit of color, about 5 minutes.
5. While the asparagus is cooking, brush your bread slices with a bit of olive oil and toast them (or char them on a grill if that's accessible!).
5. Add a generous pinch of salt and some fresh ground pepper to the asparagus and stir.
6. Add your glug of white wine or squeeze of lemon juice to deglaze the pan. When stirred, it should emulsify with the oil and create a sauce-like glaze over the asparagus. Taste for doneness; you want the asparagus to be cooked but still have a bit of crunch to it.
7. Remove the pan from the heat. Toss in the capers, minced parsley and chopped almonds. Toss to combine.
8. Pile the asparagus mixture high onto each slice of toast. Enjoy immediately.